How to migrate Mirth Connect channels, step by step
Moving off Mirth Connect is usually pictured as a rewrite: every channel rebuilt, every transformer retested, a long cut-over weekend. It does not have to be. With Perfuse, a free Apache-2.0 integration engine, your channels convert automatically, your JavaScript runs as it is, and you prove the result on your own traffic before you switch.
This guide walks through a migration from start to finish. It works the same for Mirth Connect, the Open Integration Engine (OIE) and BridgeLink.
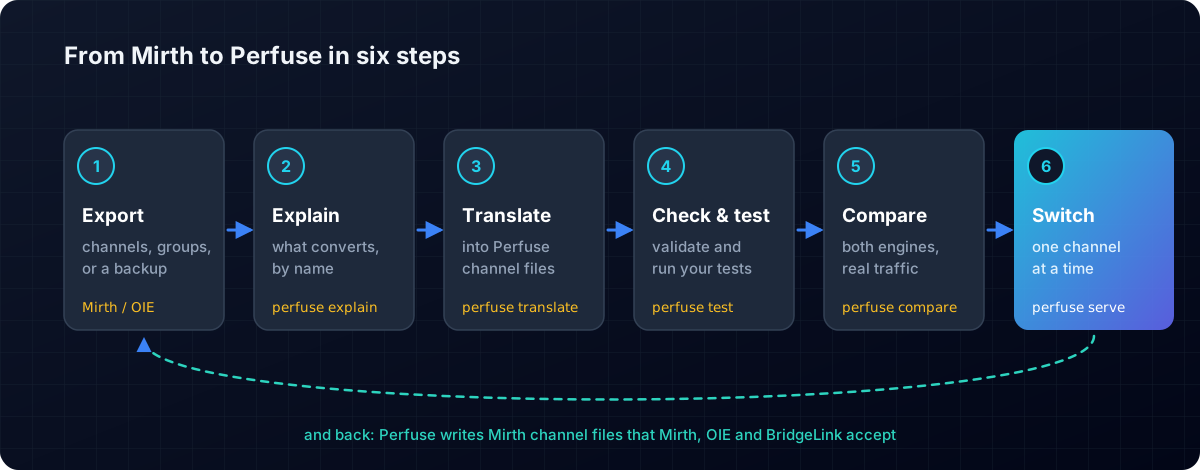
Step 1: Export from Mirth
In the Mirth Administrator, export what you want to move. Any of these works:
- a single channel (
.xml) - a channel group
- a code template library
- a whole server backup, which carries every channel, group and code template at once
Put the exports in one folder, for example mirth-export/.
Step 2: See what you have
perfuse explain mirth-export/explain reads every channel and tells you, by name, what converts directly, what converts with a note, and what needs a decision from you. You get the full picture before you change anything.
For a deeper look, the Mirth migration screen in Perfuse's web console shows the same report, with a lock-in audit that lists the Java dependencies your channels use.
Step 3: Translate
perfuse translate -o channels/ mirth-export/Each Mirth channel becomes a Perfuse channel file:
- Sources and destinations are mapped to Perfuse's connector types: MLLP, TCP, HTTP, SOAP, file, FTP, SFTP, SMB, WebDAV, database, DICOM, SMTP and more.
- Filters and transformers come across as scripts that run unchanged, E4X included:
msg['PID']['PID.5']['PID.5.1'],for each, XML literals,channelMap,$(),DateUtilandSerializerFactory. - Code template libraries become shared script files under
lib/, included by the channels that used them in Mirth. - Nothing is dropped silently. Every part is translated, carried across as a script, or listed for you.
Add -strict in a script or a CI pipeline to stop if anything needs attention, or -json for a machine-readable report.
Step 4: Check and test
perfuse check channels/
perfuse test channels/
check validates every channel and prints what it does in plain words. test runs the tests you write against a channel: a message in, the expected message out. Perfuse can also make synthetic traffic with perfuse generate, or turn real messages into a shareable test corpus with perfuse deident.
Step 5: Prove it on real traffic
This is the step that makes the switch safe. Run both engines on the same production messages, with only Mirth delivering, and write each engine's output to a folder. Then:
perfuse compare -left-name Mirth -right-name Perfuse mirth-out/ perfuse-out/Messages are paired by their control ID (MSH-10), and differences are grouped by cause, so three thousand messages that differ for one reason show up as one finding. Expected differences, such as timestamps, can be ignored with -ignore MSH-7,MSH-10. Message content stays out of the report unless you ask for it, so the report is safe to paste into a ticket.
Inside Perfuse, shadow mode goes further. A channel can run beside the live version, on real traffic, delivering nothing, and show you field by field where the two disagree.
Step 6: Switch over, one channel at a time
Start Perfuse with your channels:
perfuse serve -channels channels/Open http://127.0.0.1:8080 to see every channel, message and queue in the web console. Move feeds one at a time: point the sender at Perfuse, watch the dashboard, and move on. Perfuse's durable on-disk queue keeps every message in order and survives restarts, and acknowledgements go back only after delivery, so nothing is lost along the way.
And if you ever need to go back
Perfuse exports too. Any channel built or changed in Perfuse can be written as a Mirth channel file, and Mirth, OIE and BridgeLink all accept it, verified across ten transport pairs. You are never locked in.
Why teams move to Perfuse
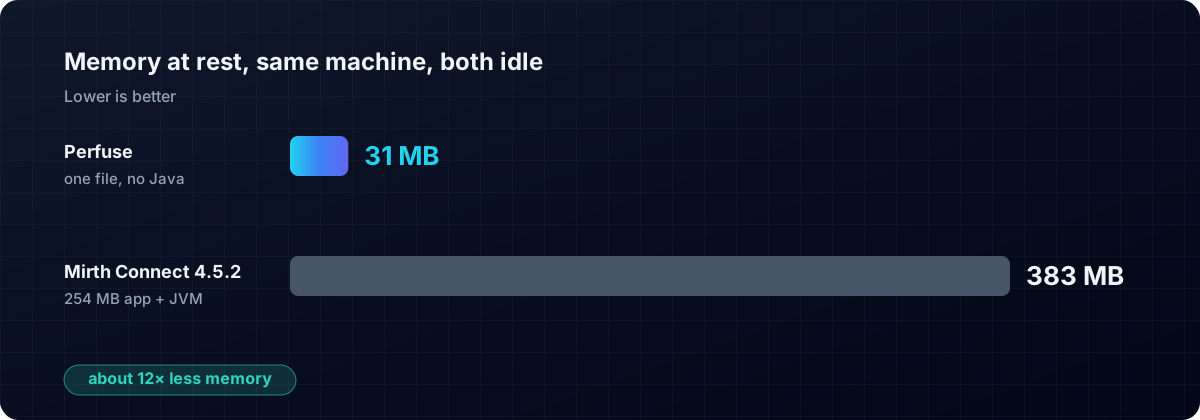
- One file, no Java. 31 MB of memory at rest against Mirth's 383 MB on the same machine, and no JVM to install, patch or tune.
- Everything in the browser, and every channel is also a plain file you can keep in git.
- More than Mirth ever had: shadow mode, feed contracts that catch upstream changes, eleven kinds of alerts, Prometheus metrics, tracing, and finding a patient's messages across HL7 v2, FHIR, DICOM and X12 at once.
- Modern standards built in: FHIR R4, R4B and R5, US Core, Da Vinci CRD, DTR and PAS, CMS-0057 payer APIs, TEFCA and UDAP, eCR and SMART Health Links.
- Enterprise sign-on: SAML, OpenID Connect, LDAP, passkeys, SCIM and mutual TLS.
- Free and open: Apache 2.0, no licence keys and no paid tiers.
Start now
- Download Perfuse from the latest release.
- Run
perfuse explainon one of your channel exports. - Read the manual for every connector and option.
Related: the Mirth 4.6 licence change and your options.
Mirth and Mirth Connect are trademarks of their respective owners, used here only to describe compatibility.